Sunday, January 23, 2011

Balsamic Reduction

Last night we had a quick meal that was healthy and used up a large bunch of spinach in the fridge!  It's weird that one of the positives is that it used something green and leafy....I really fight to eat all the door to door organics veggies before the next batch.  At the moment it is a chore, not stressful, it's just keeping me on my toes. I can't complain, I signed up for the deliveries to encourage me (and the significant other) to eat more fruit and veggies. The sad thing is we signed up for the smallest amount (Bitty Box) and we're still struggling. My hope is I can create and acquire more healthy recipes and get to the point where I'm choosing what to use the produce for, rather than scrambling to think of something to do with it.  I can see that happening with some vegetables; I have no problem with kale anymore (soup, wilted in a creamy sauce or oven baked chips), I wouldn't have said that last year at this time. in fact I'm not sure if I could distinguish kale from chard from collard greens last year!

Last night's meal was a broiled sockeye salmon on a bed of wilted spinach with onions and garlic, topped off with a balsamic reduction.  It was wonderful and made me happy!  I've had similar reductions with lamb and thought of it as a dark meat sauce.  I'm not sure why I thought of it last night, because I usually put Dijon mustard or dill on salmon, but for some reason a balsamic reduction sounded like it would work nicely with spinach and salmon.

Balsamic Reduction Sauce

This is what you need;
1 Tbsp olive oil
1/4 cup finely chopped onions
1/4 cup balsamic vinegar
2/3 cup chicken broth
1 Tbsp Earth Balance, buttery spread (soy free)

This is how you make it;
  • Sauté the onions in olive oil for a few minutes until they are just about to turn brown and there is no hint of crunchiness. You want to fry out some of the moisture and you don't want a crunchy onion texture to interfere with the main meal, conversely, you don't want crispy or overcooked plastic onions either...yes, I'm a little picky about my onions. 
  • Add the vinegar and broth and summer until the volume has reduced to less than half of the original volume and forms a thin runny glaze over the back of a wooden spoon.
  • Finally add the Earth Balance, stir until melted, serve immediately
This makes enough for 2 generous portions (over everything on the plate), or 4 directly portions (cover protein on the plate).


[gluten-free dairy-free soy-free yummy]

Friday, January 21, 2011

Green Vegetable Bisque

Oh yes, this has to be good for you! If you have eaten badly recently, if you know you haven't been getting your 5 servings a day, make a batch of this and feel good.  Even better, have it with a glass of wine and you'll probably reach the recommended intake of fruits and vegetables for the day :-)

Reason for this recipe
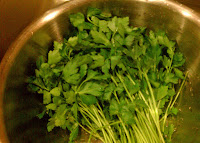
Organic Flat Leaf Parsley
Picture the scene, the fridge was full of lettuce and green leafy stuff from last week's DTD Organics delivery. Bulk quantities of Costco avocados along with cilantro and citrus fruits fill the vegetable draw and today is the day another DTD Organics delivery will be placed in the cooler out side for me.  When I signed up I promised myself I would eat everything they brought me...so I had to make room for the new delivery!  My first thought "throw it all in the blender and make a robust luminous green vegetable smoothie",  it would get the job done, but there had to be a better choice on a day when 3 inches of snow was predicted.  I decided to make a warm creamy smoothie and give it a sexy name!

This is what I used;
2 Tbsp olive oil
1/2 large onion (finely chopped)
1 garlic clove
3 celery sticks (finely chopped)
Bunch of Arugula (washed and loosely chopped)
Bunch of Flat Leaf Parsley (washed and loosely chopped)
Whole head of Lettuce (washed and loosely chopped)
1/2 cup cashews (soaked in water in the fridge overnight, or at least for 4 hours at room temperature)
3-4 cups Stock/Broth Chicken or Vegetable (or water, if you must)
1/2 tsp Celtic salt
1 Tbsp Herbs De Provence (or your favorite herb mix)

This is how you make it;

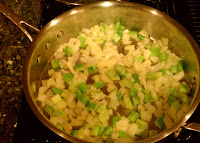
Sauté the onions, garlic and celery  in olive oil until the onions change color from white to translucent off-white. Add green leafy ingredients and wilt them; I use tongs and gently pick up pieces and turn them over until the bulk has reduced.  The leaves should not be too soggy, just a little floppy.


Add the wilted and sautéed ingredients to a blender and add 2 cups of broth to help blend the mix. Most recipes have you heating broth with the ingredients before you blend, but then you end up with steaming fluids and exploding blenders - why not blend with broth from the fridge?

Return the blended solution to the pan, add another cup of broth and season with salt and herbs;  gently simmer for 10 minutes. If's too thick for your liking, throw another cup of broth in, nobody's counting! :-) Also, don't let the algae sludge put you off, be patient, even though the soup will have a very strong parsley flavor now, it will mature into something wonderful as it simmers.


After 10-15 minutes the Herbs De Provence flavor will start to infuse through and your kitchen should smell very appetizing. While it's simmering, prepare the finishing cream for the bisque.  Drain and rinse the cashews and put in a blender with 1/2 cup water.  Blend until a pouring cream consistency is achieved (you may need to blend for a minute or two to get the required smoothness).

Reduce the heat and add the creamy cashew mixture (save some for garnish).  The algae-looking soup will be transformed into a wonderful creamy bisque! Again don't forget to taste and adjust the seasoning if needed. I think it turned out really well, I love the creamy nutty flavor of the cashews with the herb flavored greens.  Even the significant other was pleasantly surprised!


This recipe makes about 4 servings depending on whether you use it as an appetizer or main meal. It will go well with grilled cheese or any warm sandwich!

Wednesday, January 19, 2011

Cauliflower and a Cheese-Like, Non-Dairy Horseradish Sauce!

We got a beautiful organic cauliflower in our Bitty Veggie box from Door To Door Organics last week and this is what I did with it!

Relevant side story:
Over the holidays I had made some fingerling potato skins with horseradish filling to take to my sister-in-laws house.  While I was there I had a fortuitous taste-bud-to-brain malfunction and I forgot what I was eating; the creamy potato skin filling tasted like it had sharp cheddar in it ... very interesting. 
Note to self - Remember horseradish when sharp cheddar is needed.
So when the cauliflower arrived, I knew what experiment I had to do.  

This is what I used;
 Whole head of cauliflower, cleaned and broken into florets
Horseradish Sauce
  1 Tbsp olive oil
  1 Tbsp rice flour
  1 cup unsweetened hemp or coconut milk
  2 Tbsp nutritional yeast
  1 Tbsp sesame tahini
  1 Tbsp horseradish
  dash of salt
  dash of garlic powder
  dash of onion powder
  1 tsp rice vinegar
Optional;
  turmeric(for coloring)
  dash of nutmeg

This is what I did;
Set the oven to 350 F.

Lightly steam the cauliflower for 5 minutes and place in an oven-proof dish with the florets facing up.

Make a roux with the oil and flour; heat the oil and mix in the flour to make a thick paste, on medium heat slowly add milk in stages as the sauce thickens. After adding the milk, slowly stir in nutritional yeast, sesame tahini, horseradish, salt, garlic powder, onion powder, rice vinegar and cook (keep stirring) for about 10 minutes until the sauce thickens. Don't forget to taste the sauce at this point and add more horseradish, salt, garlic powder or onion powder if you feel something is missing or want a stronger taste.

At this point you can add turmeric to make the sauce yellow and more cheesey-looking, it doesn't add any flavor.  I added a dash because it's good for you and I wanted to see if it really would look like a cheese sauce.  It looked more like custard and made the cauliflower look like scrambled eggs, but at least I got the turmeric benefits!

Pour the sauce over the cauliflower florets and grate some fresh nutmeg over the top.  Place the dish in the oven for 10 minutes until the cauliflower is cooked through, the sauce is bubbling and the flavors have all melded together (not sure what that looks like....must be a zen thing, when it looks ready, it means it's ready).

---

Seriously you can never totally replicate a good cheese sauce, but I think this does a pretty good job.  What I was happy about was how well the horseradish went with the cauliflower. This is really a recipe for Cauliflower and Horseradish Sauce and it really should be named that, it doesn't need to hide under a pseudo cheese title so people will try it!.  It is a really nice pairing and it made me realize that I prefer cauliflower and horseradish to cauliflower and cheese - so there!

Monday, January 17, 2011

Weekend Breakfast Potatoes

This recipe arose out of laziness.  We had problems getting out of bed at the weekends, getting dressed and driving to a breakfast place.  It also had something to do with the long lines at restaurants on Saturday and Sunday mornings that we just couldn't tolerate.

You might also be surprised to hear that it took quite a few years to perfect this recipe to a reproducible version....let's just say we ate a lot of soggy undercooked and hard potatoes with our poached eggs.


Indredients
Big white potatoes, we use one potato per person depending on the size of the potato, and the person :-)
Secret Salt (see the bottom of this recipe), or any msg-free spicy salt you like!
Natural Balance (soy-free) Spread (this version produces the crispiest potatoes...if you eat dairy, then butter will work well)

Method
Par-cook the potatoes in a microwave (if your microwave takes 5 mins to cook a baked potato, cook for 4 mins for this recipe);

Let the potatoes stand for about 5 minutes to cool and evenly heat through. This is important, in the early days we would end up with a mixture of over and under-cooked potato cubes until we slowed down and let the potato finish cooking after it had been removed from the microwave.  Another option is to put the potatoes in the microwave, get a cup of coffee and go back to bed and read the newspaper for 10-15 minutes...the tatties will be perfect by the time you go for your next coffee!

Cut the potatoes into 3/4 inch cubes, spread them out on a cutting board, sprinkle with secret salt and leave to cool for about 15 minutes. Read another section of the Sunday paper!  The purpose of this is to dry the potatoes so they are crispy and not mushy.

Heat a decent chunk of spread in a large frying pan (or anything with a wide base), and melt until it just starts to sizzle, add the salted potato chunks and toss until all are lightly covered.  On medium heat gently saute the potatoes for the next 5-10 minutes; gently turn and agitate so they become brown and crispy on all sides.

I serve this with poached eggs (from local, happy, pasture-raised chickens) with a freshly chopped organic avocado, cucumber, cilantro or tomato garnish.

Saturday, January 15, 2011

Blueberry Almond Muffins

I have mentioned my almond muffins before but since then I have modified the recipe to the point where I consistently make this version.  I still have one a day with my 10am coffee and I still believe they are a good diet aid as they keep me satisfied until lunch time! I once went through and worked out the nutritional information, I think they are about 160 calories each and fairly low carb.
Ingredients
  • 2 cups almond flour (almond meal) - I use unblanched almond flour
  • 2 teaspoons baking powder
  • 1/4 teaspoon salt (or less) 
  • 1 tablespoon of SteviaPlus (or the equivalent of 1/3 cup of sugar, if you use a 1/3 cup of liquid sweetener reduce the water by 1/3 cup) 
  • 1/2 cup of freeze dried blueberries (if you don't add f/d blueberries reduce the water by 1/3 cup)
  • 1/3 cup coconut oil 
  • 2 eggs
  • 1 cup water
  • 1 teaspoon vanilla (this helps mask some of the bitterness of stevia)

Method
Preheat oven to 350 F and place cake cups in a 12-muffin tin.(please use cake cups - they'll stick in the muffin pan no matter what you do) .
Mix dry ingredients together well including the blueberries.  I use freeze dried blueberries because fresh or frozen ones will sink to the bottom of the muffins (remember there's no gluten in this and fresh blueberries will be too heavy). Also, make sure the stevia is mixed in well, you don't want concentrated patches that produce bitterness.
Beat the eggs and add the oil, water, vanilla and mix thoroughly.
Stir  the wet ingredients with dry ingredients and immediately fill muffin papers  (about 2/3 full - fill all 12 muffin papers evenly) and bake for about 15 minutes until they are just lightly browned.

**Eat all within 24 hours or freeze to store**
I'm not sure if it's the eggs or almonds but these are not very shelf stable!
Also note, stevia has a slight bitter aftertaste that mellows as it sits with other ingredients, for that reason I leave the muffins in the fridge overnight before I freeze.

Photo has blueberry muffins in the foreground with plain muffins top left.

Thursday, January 6, 2011

Raw Pecan Pesto Stuffed Mushrooms

Just so you know...I hate mushrooms!
I don't like their texture and I usually pick them out of stews and meals that have them.  What I didn't realize was that I didn't like "cooked" mushrooms!  I just love this recipe because marinated mushrooms don't have the same texture and sliminess as cooked mushrooms!

My inspiration for this came from a Walnut and Spinach Pesto Stuffed Mushrooms recipe on http://foodsforlonglife.blogspot.com. I changed some of the ingredients to make a sweeter version.


Ingredients
8 small or 5 medium Baby Portabella Mushrooms ( I like them because they are shaped better for stuffing, but White Button Mushrooms will also work)
1 cup Basil Leaves
1/4 cup Pecans
1 Tbsp Lime juice
1 Clove Garlic, chopped
1/2 tsp Olive Oil
1/4 tsp Salt
1 Tbsp Nutritional Yeast 
Balsamic Vinegar

Method
Remove the mushroom stems and gently remove some of the inside so there is room for the filling. Clean (and I peel) the mushrooms and.save the stems for the filling. Steep the mushroom caps in a little balsamic vinegar and let them marinate for about 15 minutes; I turn them over a few times to make sure they are well soaked.
  

Place the pecans, basil, lime juice, garlic, olive oil, salt, mushroom stems and nutritional yeast in a food processor and buzz for a few seconds until well mixed, don't over process, it shouldn't be a paste.


Remove the mushrooms caps from their balsamic bath and stuff with the mix.  Server at room temperature. I have no idea how long you can store them because we usually eat them immediately!


Oh, make sure your significant other has some too...the garlic can be a little antisocial ;-)

Tuesday, January 4, 2011

Curried Squash Soup

Over the last couple of weeks I was overwhelmed with squash of all shapes and sizes and on top of that the last two deliveries from Door To Door Organics dot com had a Butternut and Delicato squash.  Both have happily decorated my kitchen counter and waited patiently through the holiday festivities for their turn, so today I thought it was about time I used them for something yummy...it is Soup Season after all!!!!

Ingredients
1 Butternut squash, peeled cored and cubed
1 Delicata squash, peeled cored and cubed
    (about a total of 2-3 cups of cubed squash)
 2 Sweet Apples cored and roughly chopped - I used 2 Braeburn's (there is no sweetener in the ingredients so if you use Granny Smith's you may want to add a dash of agave or honey)
1 Onion chopped
2 Tbsp Olive Oil
1-2 Tbsp Curry Powder/Paste - I used a Mild Yellow Curry Powder from the Savory Spice Shop.
4 Cups  Vegetable (or Chicken) stock
1/2 Cup White Wine - I used Italian Frascati what we had open in the fridge

Optional
1.5 cups hemp, almond or coconut milk
2 Tbsp toasted pumpkin or sunflower seeds (garnish)


Method
Peel each squash, remove seeds and chop into 3/4 inch cubes.  Place cubes in a pan, cover with water, and boil until tender ~ 5-10 minutes.  In a big soup pot, heat the olive oil and saute the onion and apple...don't under cook the onions, take your time and let the onions saute for at least 10 minutes until they start to caramelize a little.  Drain the squash and mash lightly then add to the apple and onion mixture (the orange and red colors will look wonderful).  Stir in the curry powder, stock and wine and bring to a boil and then simmer everything for 20 minutes to let all the flavors mingle. Taste for sweetness, salt and curry spice and add more if necessary (if it is a little bland, add some salt).


Cool the soup mixture and process in a blender in about 3 batches.  Please be careful when blending the soup, if it is too hot it will build up pressure while blending and push the lid off - the first time I tried to blend something that was too hot it exploded in my kitchen and could have burned me quite badly if I hadn't been quick on my feet.  So, please be careful; let the soup cool and place a cloth on the lid and hold down when you blend.

Return the soup to the pot and taste again (just to be sure).  At this point the soup should be very thick, I generally add about 1 to 1.5 cups of water and warm before serving.  You could also add hemp milk, almond milk or even coconut if you like a creamier taste.

This recipe makes about 6 x 8 oz portions and freezes well.  I save individual portions in mason jars and microwave them for lunch.

You could also serve more people and serve in small espresso cups as an amuse-bouche.  See top photo, garnished with toasted sunflower seeds.